I think we can all agree, it’s been a long winter, or at least those of you not in sunny, warm locations that don’t really have to deal with winter. Even though I know there is more cold weather in the forecast, it was a great first day of spring yesterday. The temperature hit the mid-50s, the sun was shining, and I took the opportunity to plant my seeds.
 There were a number of seeds in my order that required early planting, and yesterday was the perfect day for it. I received my order from Baker Creek Heirloom Seed Company a few weeks ago, and I purchased my supplies, pots and soil, so I was ready.
The last few years, I’ve used biodegradable peat pots for planting seeds. It works out really well. They soak up the water and stay moist, and you can plant the whole thing when you’re ready to plant outside, great for those tender transplants. This year I  purchased Jiffy Strips from the Home Depot. They are cheap, $2.49 for a 5 pack, which can hold 50 plants. The other great thing is, you can write directly on them. Instead of needing popsicle sticks or some other way to mark which seedling is which, I just use a Sharpie and write on the outside of the strips. It’s that simple.
For this planting, I like to use an all-purpose potting soil. It’s full of nutrients and stays moist. VIgoro All-Purpose Potting Mix was the brand of choice this year, because it’s what I  had left over from the fall. And a side note about potting soil, make sure you keep the bag closed once it’s opened. I like to twist the top of the bag and fold it over itself. Even if it’s a resealable bag, it never seems to stay closed for me. If it’s left open, the soil will dry out. If that happens, before using the soil, just dump a few cups of water into the bag, toss it around, and leave it sit for a day or so. The soil usually perks right back up. I know you’re probably thinking that you can do the same thing in the pot, but you really can’t. The water drains too quickly and it can’t hold the moisture, so it never perks up. Throwing some water in the bag before using it definitely works better.
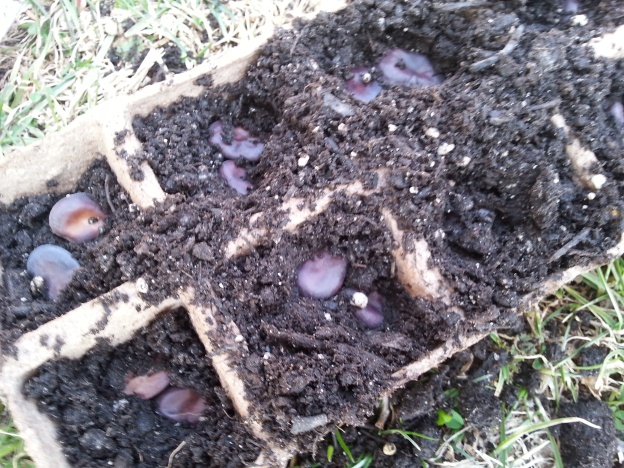
 So once I have my strips labeled, I start planting. I follow a pretty simple process. For seeds that need to be planted deep, like the fava beans, I fill the strips with soil, then drop the seeds on top. I always plant multiple seeds, at least 2-3, just to be sure that something comes up. Then I push the seeds down deep into the dirt. These need to go 1-2 inches down. I top them off with soil and pat everything down a bit so there isn’t any loose soil. Done!
 For finer seeds, like the tarragon, which didn’t need to be planted that deep, I fill the strips with soil, then I push down the soil first. I spread the seeds then sprinkle some additional soil, but only a very light layer. Press down again to smooth the tops. Done again!
Once I had all of the strips planted, I started watering. I don’t like to pour water on top. Some of the seeds are so fine, the water can carry them away. Instead, and this is another great reason to use the peat strips, I soak  them in a tub for just a minute or two. I fill a tub with a few inches of warm water, but not enough to cover the strips. Then I soak the strips until the soil is moist. Once they’re moist, I pick them up to drain, then set them on a big tray. For this, I use a huge sheet pan that was my grandmothers, covered in foil to cut down on clean up later.
The next trick is critical for me. I cover the whole thing with plastic wrap. This basically creates the same environment as if you got one of those kits in the store that comes with the clear plastic cover. You’re creating a little greenhouse to start the seeds off right. The plastic will start to get little drops of water, and that’s how you know it’s working. The water is staying in and not evaporating. This also should  keep you from having to water for a little while. That also is a good thing. Once the seedlings emerge, you have to be careful with watering to not disrupt the tender plant or create any kind of mold or fungus that could kill the very delicate seedlings. Once the plastic is covering them, I set the whole thing in a warm, sunny spot and wait for the growth!
Before you know it, it will be time to plant outside!

Pingback: Fiesta Friday #8 | The Novice Gardener
Wow! I have never planted fava beans!
This is a first for me too…we’ll see how it goes!
Thanks for sharing some great tips – especially in watering those itty-bitty seeds. I hope we get to see pictures soon of the “sprouts of green” breaking through the soil!
Absolutely, I’ll be sharing the progress! Isn’t it exciting when they finally break through the soil?
Absolutely! Watching the progression of those little buggers truly brings great joy 🙂
Awesome tips. Happy Spring!
Happy spring to you too!
Thanks for these tips! I was wondering what to do with my potting soil that is a bit dried out in the bag. Plus, the greenhouse effect with the plastic wrap is something new to me. Even though I live somewhere that doesn’t really have a winter, there is still not enough sun or warmth to have a blooming garden. My herbs stay in the greenhouse window of my kitchen instead.
I wouldn’t mind not having a winter after this year…more snow supposedly coming next week! The potting soil trick I use all the time…it soaks it up and really works great! Good luck!
Can’t wait to see your garden grow!
Neither can I! 🙂
My tomatoes have come up! In just 2/3 days! I use a heat mat. What seeds are those?
Wow, that’s fast! I’m hoping mine shoot up just as fast. I haven’t used a heat mat, but might need to give that a try. The seeds are Extra Precoce A Grano Violetto Fava beans.
I don’t have a gardening bone in me, but I love hearing about it (and when harvest time comes)!
Harvest is the BEST!
Spring is finally here and the first rites of planting – have fun! I miss my big garden but not all of the work 🙂
It is a lot of work, but I love it. And so excited to see spring!
Pingback: How Does Your Garden Grow? | The Optimistic Househusband
Pingback: A Whole New Start to the Garden! | The Optimistic Househusband